Although there are many methods of hanging tapestries, the use of a batten with Velcro has become standard among conservators and museums. This method distributes the stresses of hanging evenly across the entire width of the fabric, it allows for quick and easy repositioning of the tapestry and the tapestry is easy to install. It is recommended for medium to large sized tapestries.
Supplies needed
1. Batten – Most commonly the batten is made of clear, straight grained wood, approximately 1/2” x 3 – 4” in dimensions. Soft woods such as fir, pine or alder are suitable. For very large, and thus heavy, tapestries a stronger wood with larger dimensions, such as 1” x 4” piece of mahogany or oak is advised. The batten is cut approximately two inches shorter than the width of the tapestry. It is sealed with two coats of polyurethane to protect the tapestry from acid in the wood. The batten may also be covered with washed cotton or linen.
2. Velcro hook and fastener, two inches wide and approximately two inches shorter than the width of the tapestry
3. Heavy undyed twill tape or canvas webbing, two to three inches in width
4. Staple gun with non-rusting staples
5. Eye Screws
6. Cotton sewing thread
Steps
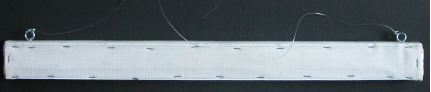
1. Apply two coats of polyurethane to the wooden batten, allowing it to dry the recommended length of time. If you wish to cover the board with cotton or linen, cut the fabric to a size that will allow the board to be wrapped (as you would a gift package). Stretch the cloth tightly as you wrap it completely around the batten. Secure the cloth by stapling through the cloth and into the board every two or three inches. Position the hooked half of the Velcro along the top edge of the board and staple every two inches to secure it. If the row of staples that secures the cloth is in the top two inches of the batten, they will be covered completely by the Velcro. Screw in two eye screws along the top edge of the batten.
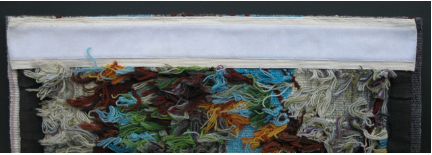
2. Position the soft half of the Velcro in the center of the cotton twill tape (or canvas webbing) and sew it in place using a sewing machine. Lay the tapestry on a flat surface and smooth it out without stretching. Lay the twill tape/Velcro unit in a straight line about 1/4” to 1/2” from the top edge of the tapestry. Sew the twill tape to the tapestry by hand using a simple slipstitch. Sew from the center of the twill tape out to the edges along the top and the bottom catching only the backside of the tapestry. Add an additional row of stitches through the twill tape just below the Velcro. A curved needle makes this easier.
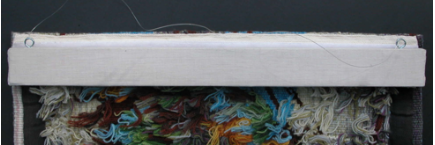
3. The batten with Velcro is attached to the tapestry by matching the two halves of the Velcro. The batten and the eye screws should not be visible from the front of the tapestry.
4. The tapestry can be hung by hooking the eye screws over nails in the wall. The tapestry can be adjusted to hang square by adjusting the placement of the tapestry on the batten. Alternatively, one may string picture hanging wire or fishing line between the eye screws and then suspended the tapestry from a hook attached to picture moulding on the wall.
Other Considerations
If the warp ends are cut and turned back for finishing, they can be covered with a lightweight twill tape, 1 1/2” – 2” in width. This will prevent excess abrasion that might lead to fraying. Preferably the twill tape is undyed. Wash it thoroughly and dry in a dryer to shrink it before you apply it to the tapestry. Cover the warp ends with the twill tape and sew in place by hand.
Weft ends on the back of the tapestry that are within a few inches of either side of the tapestry should be sewn down so that they do not hang out from the sides.